We've heard you can't wait for the second part of our Keycloak-RabbitMQ article. We won't let you wait any longer – enjoy!
3. Proxy service
As an example, we will use simple Node.js express application to act as a proxy. It will implement four endpoints mentioned above and respond according to data in Keycloak identity server. Our proxy is running at keycloak-proxy:3000 address.
Create index.js file. Here we have to define server itself and endpoints. We need body-parser package to get the content of request received from message broker.
//================================================
index.js
//================================================

import Express                          from 'express';
import BodyParser                       from 'body-parser';
import { User, Vhost, Resource, Topic } from './endpoints';

const app = Express();
const port = 3000;

app.use(BodyParser.text({ type: 'text/html', limit: '1mb' }));
app.use(BodyParser.urlencoded({ extended: true, limit: '1mb' }));
app.use(BodyParser.json({ limit: '1mb' }));
app.post('/user', User);
app.post('/vhost', Vhost);
app.post('/resource', Resource);
app.post('/topic', Topic);

app.listen(port, () => {
  console.log(`RabbitMQ proxy listening on port ${port}`);
});

//================================================
Create /user endpoint. Request body will be validated with joi package. As we can see username and password are passed further to KeycloakRequests.authenticate() function, which makes request to identity provider.
//================================================
user.js
//================================================

import Joi              from '@hapi/joi';
import KeycloakRequests from './keycloak_requests';

const validate = async (obj)=> {
  let schema = Joi.object({
    username: Joi.string().required(),
    password: Joi.string().required()
  });
  await schema.validateAsync(obj);
}

const UserEndpoint = async (req, res)=> {
  try {
    await validate(req.body);
    let authResponse = await KeycloakRequests.authenticate(req.body.username, req.body.password);
    res.send(authResponse);
  } catch(e) {
    res.send('deny');
  }
};
export default UserEndpoint;

//================================================

Create /vhost endpoint. There are two adjustments here – we must change validation, as expected schema is different, and in this case, we call KeycloakRequests.authorize() function.

//================================================
vhost.js
//================================================

import Joi              from '@hapi/joi';
import KeycloakRequests from './keycloak_requests';

const validate = async (obj)=> {
  let schema = Joi.object({
    username: Joi.string().required(),
    vhost: Joi.string().required(),
    ip: Joi.string().required(),
    tags: Joi.string().required()
  });
  await schema.validateAsync(obj);
}

const VhostEndpoint = async (req, res)=> {
  try {
    await validate(req.body);
    await KeycloakRequests.authorize(req.body.username, req.body.vhost, KeycloakRequests.SCOPES.vhost.access);
    res.send('allow');
  } catch (e) {
    res.send('deny');
  }
};
export default VhostEndpoint;

//================================================
Create /resource endpoint, similar to previous one except schema. Worth to mention is that we should limit allowed values in resource and permission fields, as they correspond to resource_type and scope in Keycloak at later point.
//================================================
resource.js
//================================================

import Joi              from '@hapi/joi';
import KeycloakRequests from './keycloak_requests';

const validate = async (obj)=> {
  let schema = Joi.object({
    username: Joi.string().required(),
    vhost: Joi.string().required(),
    resource: Joi.string().required().allow('queue', 'exchange', 'topic'),
    name: Joi.string().required(),
    permission: Joi.string().required().allow(...Object.values(KeycloakRequests.SCOPES.resource)),
    tags: Joi.string().required()
  });
  await schema.validateAsync(obj);
};

const ResourceEndpoint = async (req, res)=> {
  try {
    await validate(req.body);
    await KeycloakRequests.authorize(req.body.username, req.body.name, req.body.permission);
    res.send('allow');
  } catch (e) {
    res.send('deny');
  }
};
export default ResourceEndpoint;

//================================================
Create /topic endpoint. Here alongside different request structure we can see, that scope name passed to KeycloakRequest.authorize() is built dynamically, so instead of simple read, write… scopes for topic type resources we will have to define in our identity server scopes like write_with_rk_my_routing_key.
//================================================
topic.js
//================================================

import Joi              from '@hapi/joi';
import KeycloakRequests from './keycloak_requests';

const validate = async (obj)=> {
  let schema = Joi.object({
    username: Joi.string().required(),
    vhost: Joi.string().required(),
    resource: Joi.string().required().allow('topic'),
    name: Joi.string().required(),
    permission: Joi.string().required().allow(...Object.values(KeycloakRequests.SCOPES.topic)),
    routing_key: Joi.string().required(),
    tags: Joi.string().required(),
    'variable_map.username': Joi.string(),
    'variable_map.vhost': Joi.string()
  });
  await schema.validateAsync(obj);
};

const permissionName = (req)=> {
  return `${req.body.permission}_with_rk_${req.body.routing_key}`;
};

const TopicEndpoint = async (req, res)=> {
  try {
    await validate(req.body);
    await KeycloakRequests.authorize(req.body.username, req.body.name, permissionName(req));
    res.send('allow');
  } catch (e) {
    res.send('deny');
  }
};
export default TopicEndpoint;

//================================================
Create requests to Keycloak server. Most important for us are two functions: authenticate() and authorize().
authenticate() sends request to Keycloak OpenID Connect token endpoint, in this test case:
POST http://keycloak-server:8080/auth/realms/myrealm/protocol/openid-connect/token
Content should be marked in header as type application/x-www-form-urlencoded and alongside static values like grant_type and scope, body must include user credentials and client_id/client_secret which will be provided when our proxy will be registered in Keycloak server as new client. From the JSON object received as a response we should take access_token field, decode it as JWT token and extract client roles field. If user have attached client role starting with rabbitmq-tag-<tag> in Keycloak, it will be treated as this user have <tag> in our message broker attached. Before returning result we store access token in some kind of cache under <username> key. In case of this test we use memcached for this purpose.
authorize() – as first step we must ask Keycloak for ticket to perform permissions check. After retrieving access_token from cache, we call permissions endpoint of Keycloak server:
POST http://keycloak-server:8080/auth/realms/myrealm/authz/protection/permission
with JSON content describing what resource and with what scope we want to access. To identify ourselves we attach access_token as Authorization: Bearer … header. From response we extract ticket field and send request to OpenID Connect endpoint
POST http://keycloak-server:8080/auth/realms/myrealm/protocol/openid-connect/token
to get Request Party Token. In body we include ticket we got before and also specify grant type we use. As in previous step we must add authorization header with access token. If response succeed, we should get RPT and it means that user has access to selected resource at scope we asked. In case of request fail we assume, that access is forbidden.
//================================================
keycloak_requests.js
//================================================

import Axios from 'axios';
import Qs    from 'qs';
import Jwt   from 'jsonwebtoken';
import _     from 'lodash';
import Cache from './cache';

const SCOPES = {
  vhost: {
    access: 'vhost_access'
  },
  resource: {
    read: 'read',
    write: 'write',
    configure: 'configure'
  },
  topic: {
    read: 'read',
    write: 'write'
  }
};

const TAG_ROLE_PREFIX = 'rabbitmq-tag-';
const TAG_ROLE_REGEXP = RegExp(`${TAG_ROLE_PREFIX}\\w+`);

const OID_TOKEN_URL = `${process.env.KEYCLOAK_SERVER_URL}/auth/realms/${process.env.KEYCLOAK_REALM}/protocol/openid-connect/token`;
const PERMISSIONS_URL = `${process.env.KEYCLOAK_SERVER_URL}/auth/realms/${process.env.KEYCLOAK_REALM}/authz/protection/permission`;

const WWW_FORM_CONTENT_TYPE = 'application/x-www-form-urlencoded';
const JSON_CONTENT_TYPE = 'application/json';

const TICKET_GRANT_TYPE = 'urn:ietf:params:oauth:grant-type:uma-ticket';

const _encodeCacheData = (res)=> {
  return JSON.stringify({
    accessToken: res.data.access_token,
    refreshToken: res.data.refresh_token
  });
};

const _decodeCacheData = (data)=> {
  return JSON.parse(data);
};

const _rolesToTags = (decodedToken)=> {
  let tag = [];
  _.get(decodedToken, `resource_access.${process.env.KEYCLOAK_CLIENT_ID}.roles`, []).forEach((role)=> {
    if (TAG_ROLE_REGEXP.test(role)) {
      tag.push(role.replace(TAG_ROLE_PREFIX, ''));
    }
  });
  if (tag.length === 0) {
    return '';
  }
  if (tag.length === 1) {
    return ` ${tag[0]}`;
  }
  throw new Error('User cannot have multiple tag roles assigned in Keycloak');
};

const authenticate = async (username, password)=> {
  let call = {
    method: 'POST',
    url: OID_TOKEN_URL,
    headers: {
      'Content-Type': WWW_FORM_CONTENT_TYPE
    },
    data: Qs.stringify({
      client_id: process.env.KEYCLOAK_CLIENT_ID,
      client_secret: process.env.KEYCLOAK_CLIENT_SECRET,
      username: username,
      password: password,
      grant_type: 'password',
      scope: 'openid'
    })
  };
  let authResponse = await Axios(call);
  let decodedToken = Jwt.decode(authResponse.data.access_token);
  await Cache.set(username, _encodeCacheData(authResponse));
  return `allow${_rolesToTags(decodedToken)}`;
};

const _getUmaTicket = (accessToken, resource, scope)=> {
  let call = {
    method: 'POST',
    url: PERMISSIONS_URL,
    headers: {
      authorization: `Bearer ${accessToken}`,
      'Content-Type': JSON_CONTENT_TYPE
    },
    data: JSON.stringify([
      {
          "resource_id": resource,
          "resource_scopes": [scope]
      }
    ])
  };
  return Axios(call);
};

const _getRequestPartyTokenFromTicket = (accessToken, ticket)=> {
  let call = {
    method: 'POST',
    url: OID_TOKEN_URL,
    headers: {
      authorization: `Bearer ${accessToken}`,
      'Content-Type': WWW_FORM_CONTENT_TYPE
    },
    data: Qs.stringify({
      client_id: process.env.KEYCLOAK_CLIENT_ID,
      client_secret: process.env.KEYCLOAK_CLIENT_SECRET,
      ticket: ticket,
      grant_type: TICKET_GRANT_TYPE
    })
  };
  return Axios(call);
};

const authorize = async (username, resource, scope)=> {
  let authenticateTokens = _decodeCacheData(await Cache.get(username));
  let umaTicket = (await _getUmaTicket(authenticateTokens.accessToken, resource, scope)).data.ticket;
  let requestPartyToken = (await _getRequestPartyTokenFromTicket(authenticateTokens.accessToken, umaTicket)).access_token;
};

module.exports = { authenticate, authorize, SCOPES };

//================================================
4. Keycloak
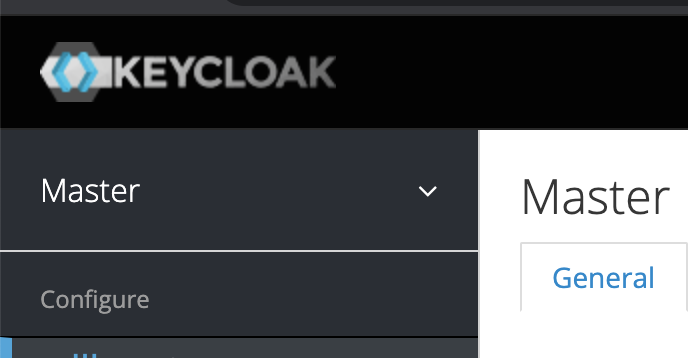
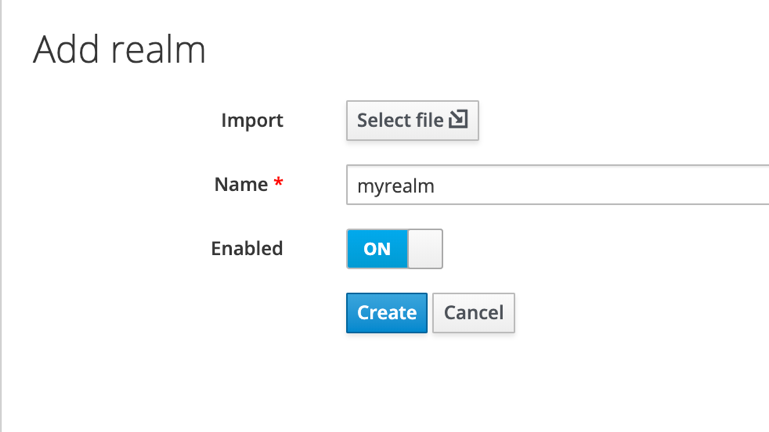
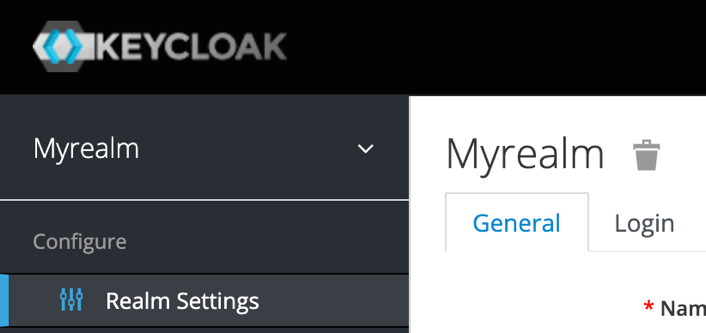
Our Keycloak server is located at keycloak-server:8080. At first, we must create new realm named myrealm and switch to it from default one.
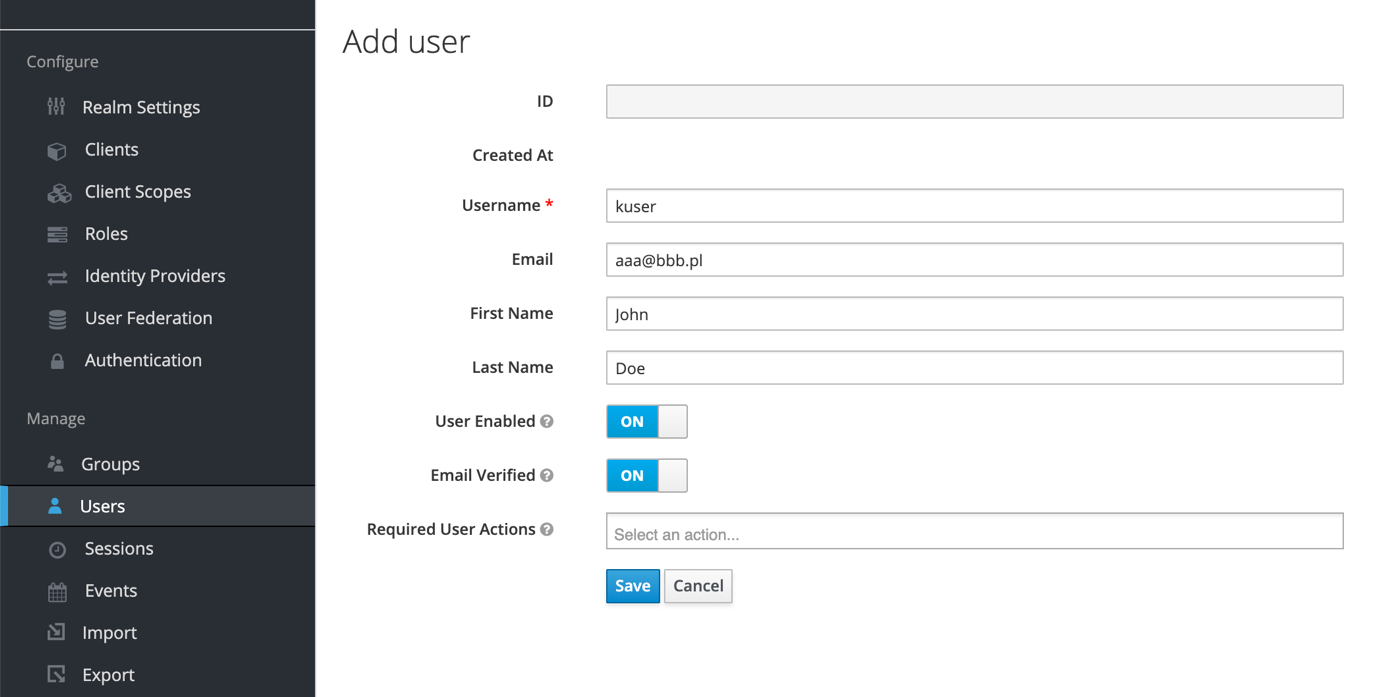
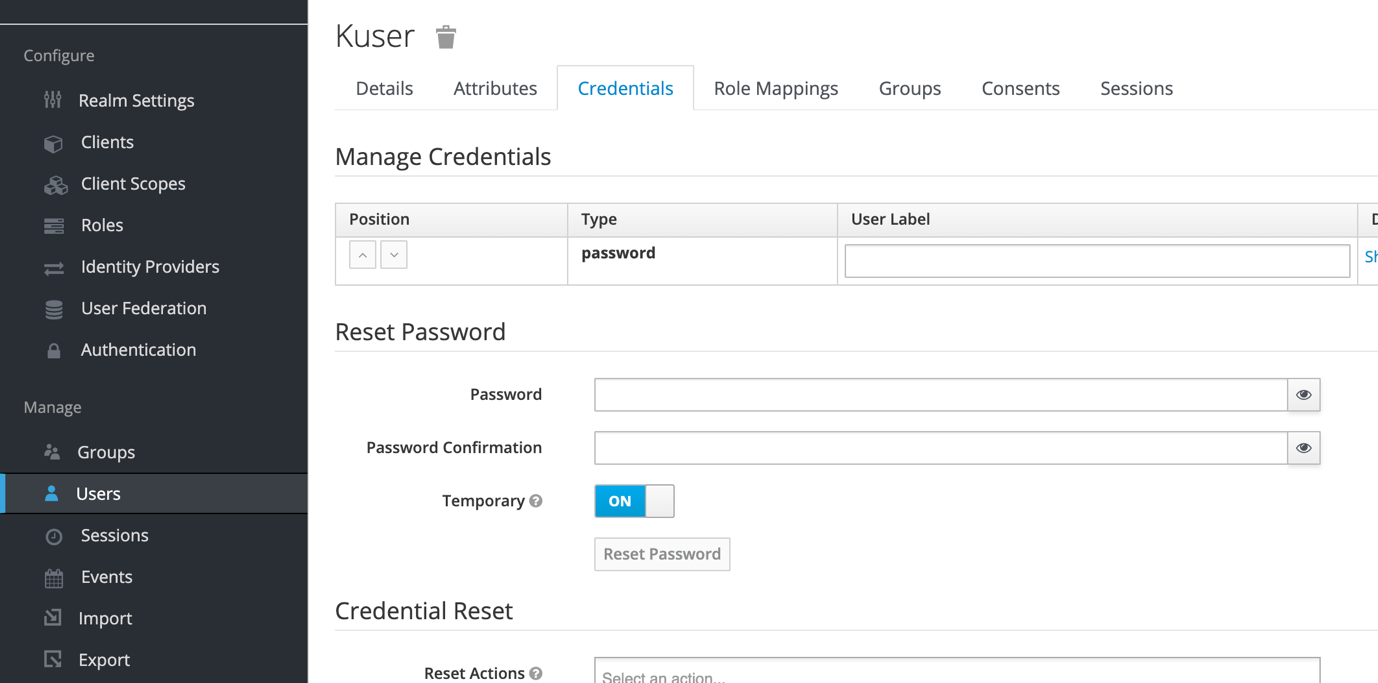
Create new user in this realm and reset password manually.
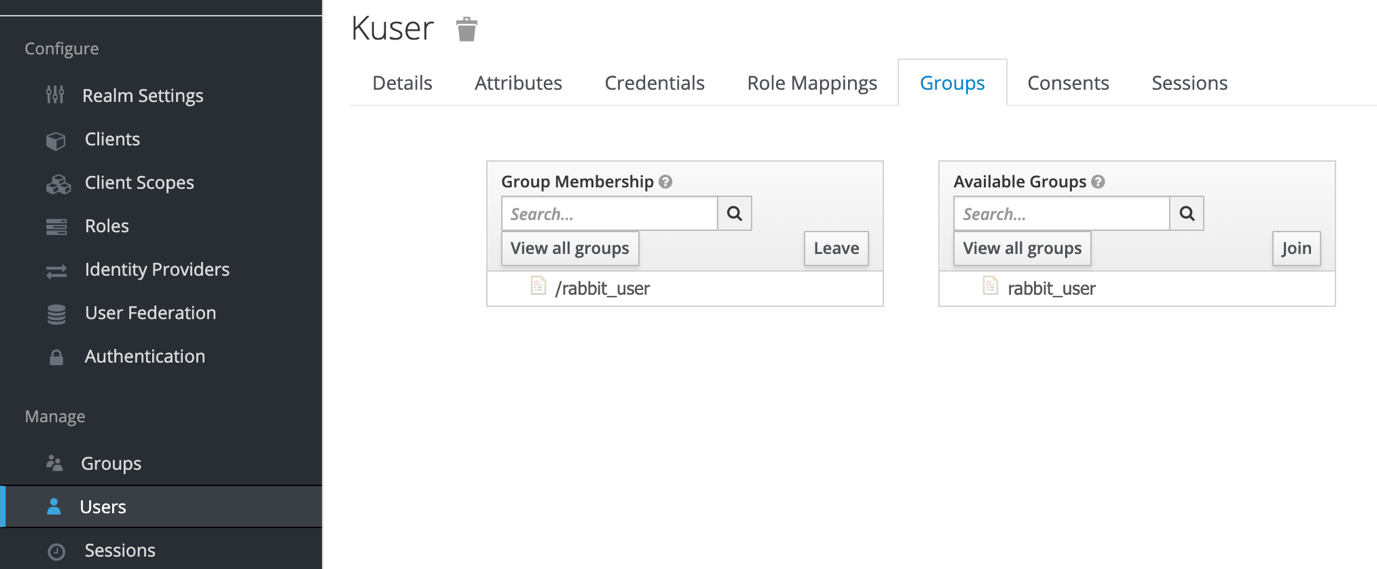
Create rabbit_users group and add previously created user to it.

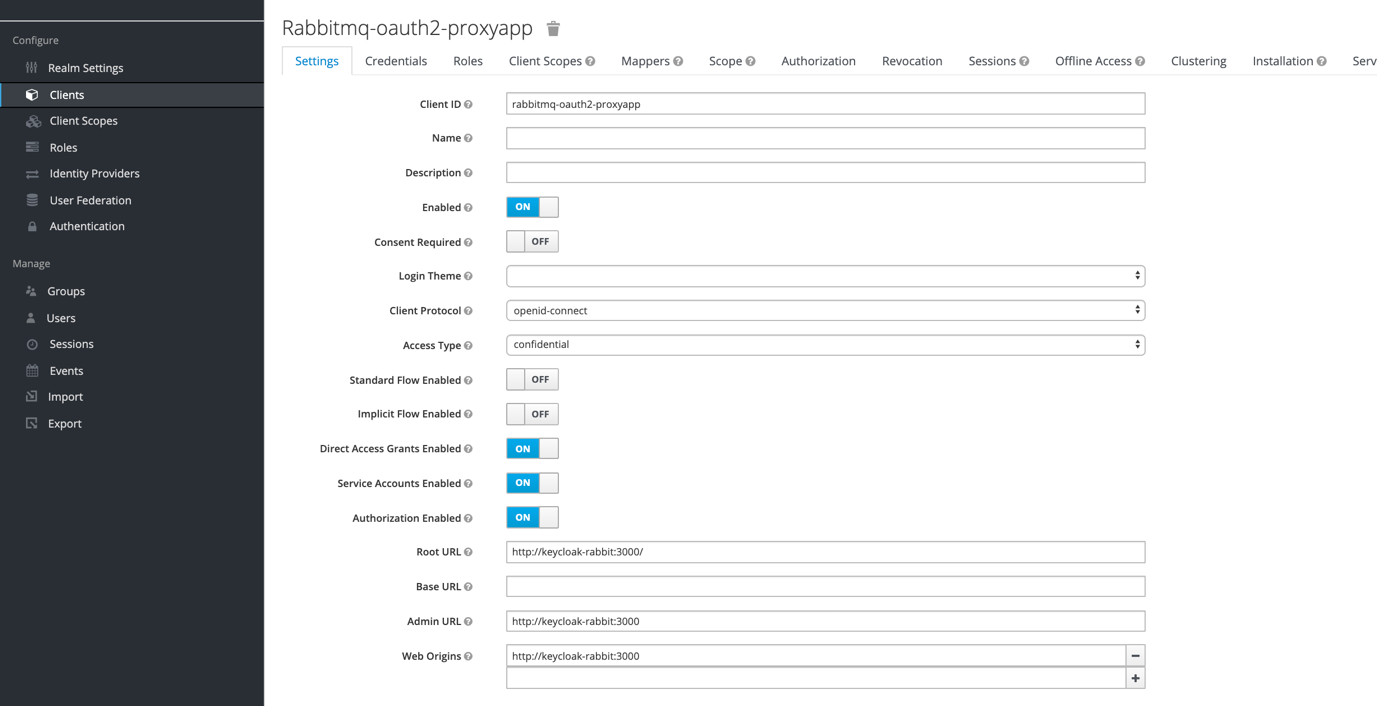
Create new client which will be corresponding to our proxy app, allowing it to access identity server. We should set client protocol as OpenID Connect and access type as confidential (it makes us to use client_secret to identify yourself, but at same time gives access to authorization framework). We don’t need standard or implicit flow, only direct access grants are required (it allows us to pass username and password directly in calls to Keycloak server during authentication, so we don’t have to go through Keycloak login app). We have to enable authorization framework here and set urls where our proxy app is located. In Installation tab we can see client_id (client name) and client_secret, which we should set as KEYCLOAK_CLIENT_ID and KEYCLOAK_CLIENT_SECRET environment variables on machine where proxy app is running.
In Authorization framework we should add authorization scopes which corresponds to scopes used by default by RabbitMQ (read, write, configure) and to routing keys we would like to use in case of authentication flow of messages through topic exchange (write_with_rk_example_routing_key, read_with_rk_example_routing_key). We need also scope which allows access to vhost (vhost_access).

In Resources tab we have to define resources for which we want to control access with Keycloak. When defining them we shouldn’t forget to set type (as we can later use it to create permissions for all resources of selected type) and to add available scopes
- read, write, configure for all queues and exchanges including topics
- vhost_access for vhosts
- read_with_rk_…, write_with_rk_… for topics

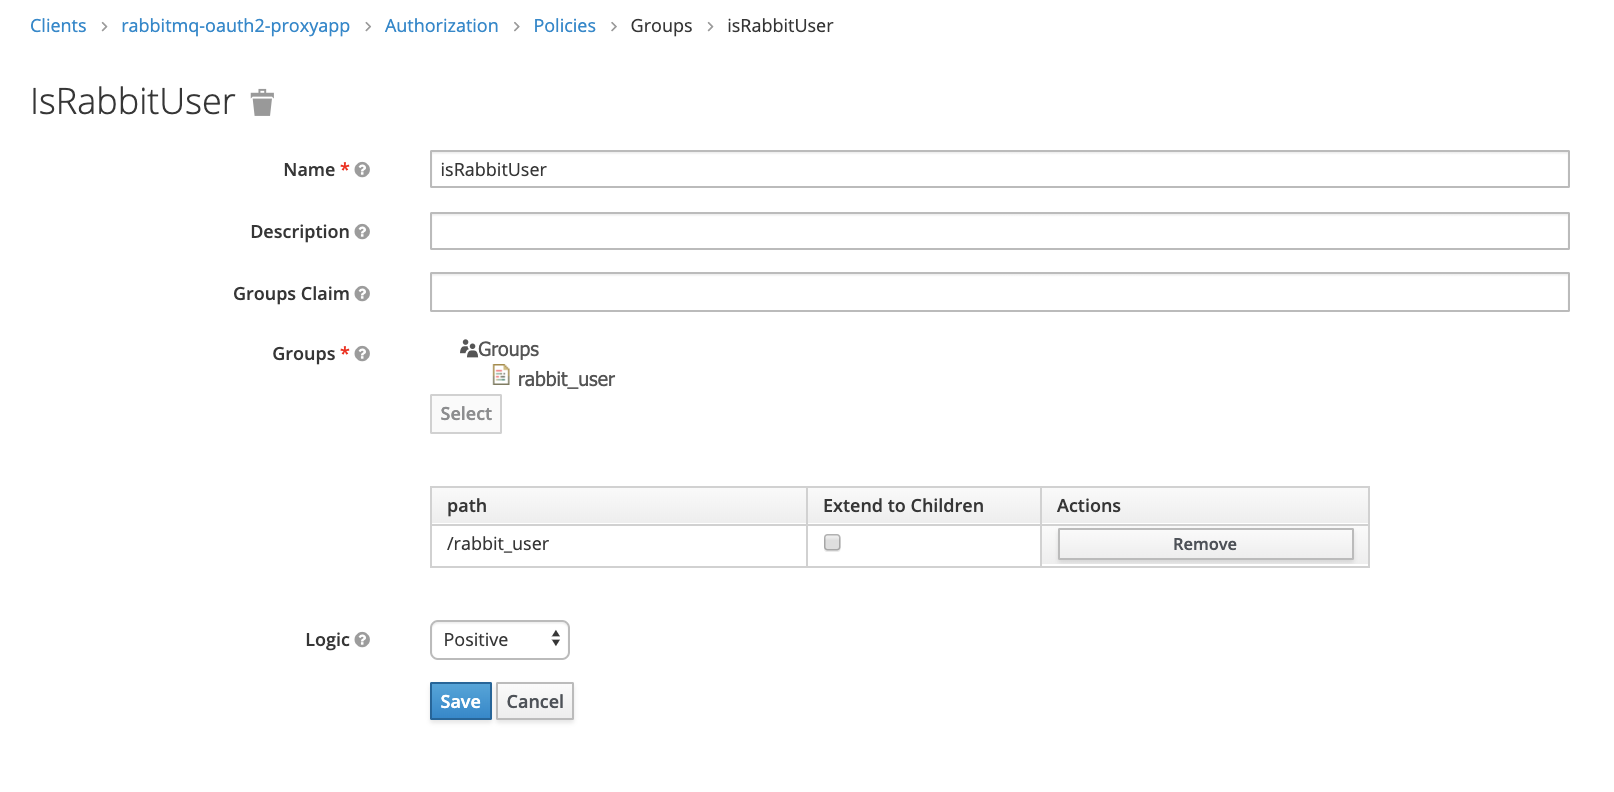
In Policies tab we should define what condition should be checked when evaluating permission. In our case lets set simple group policy which check if user is a member of rabbit_users group
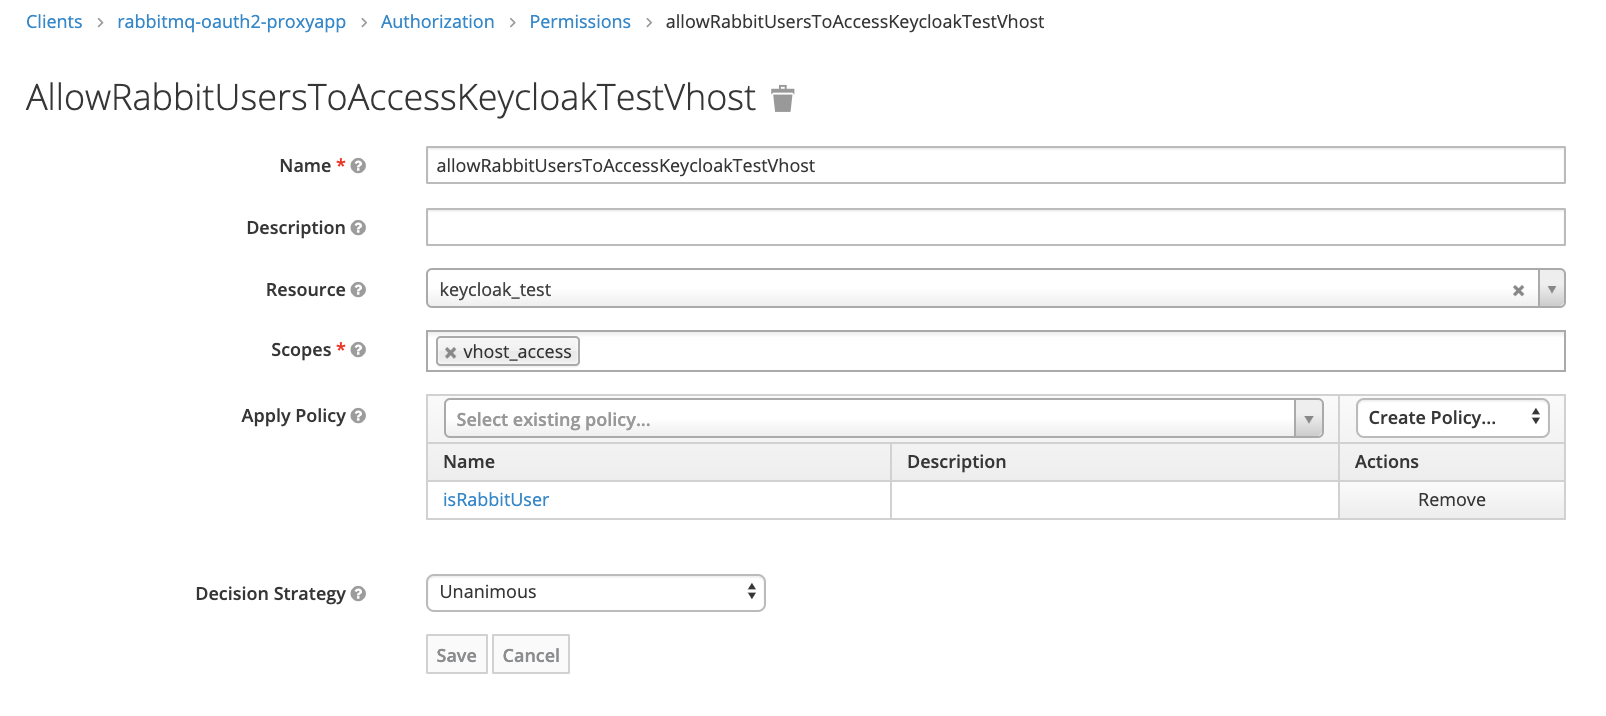
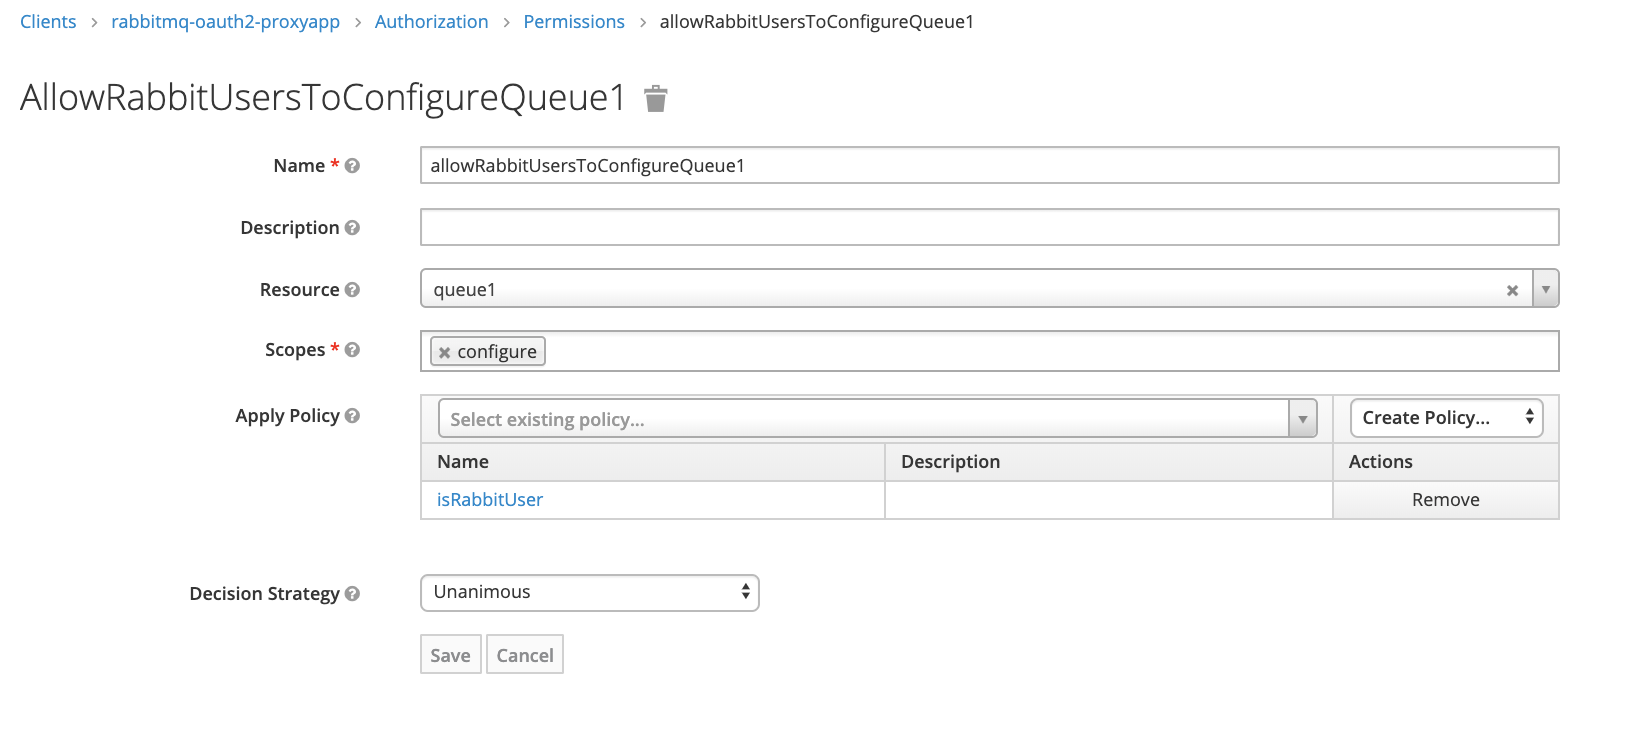
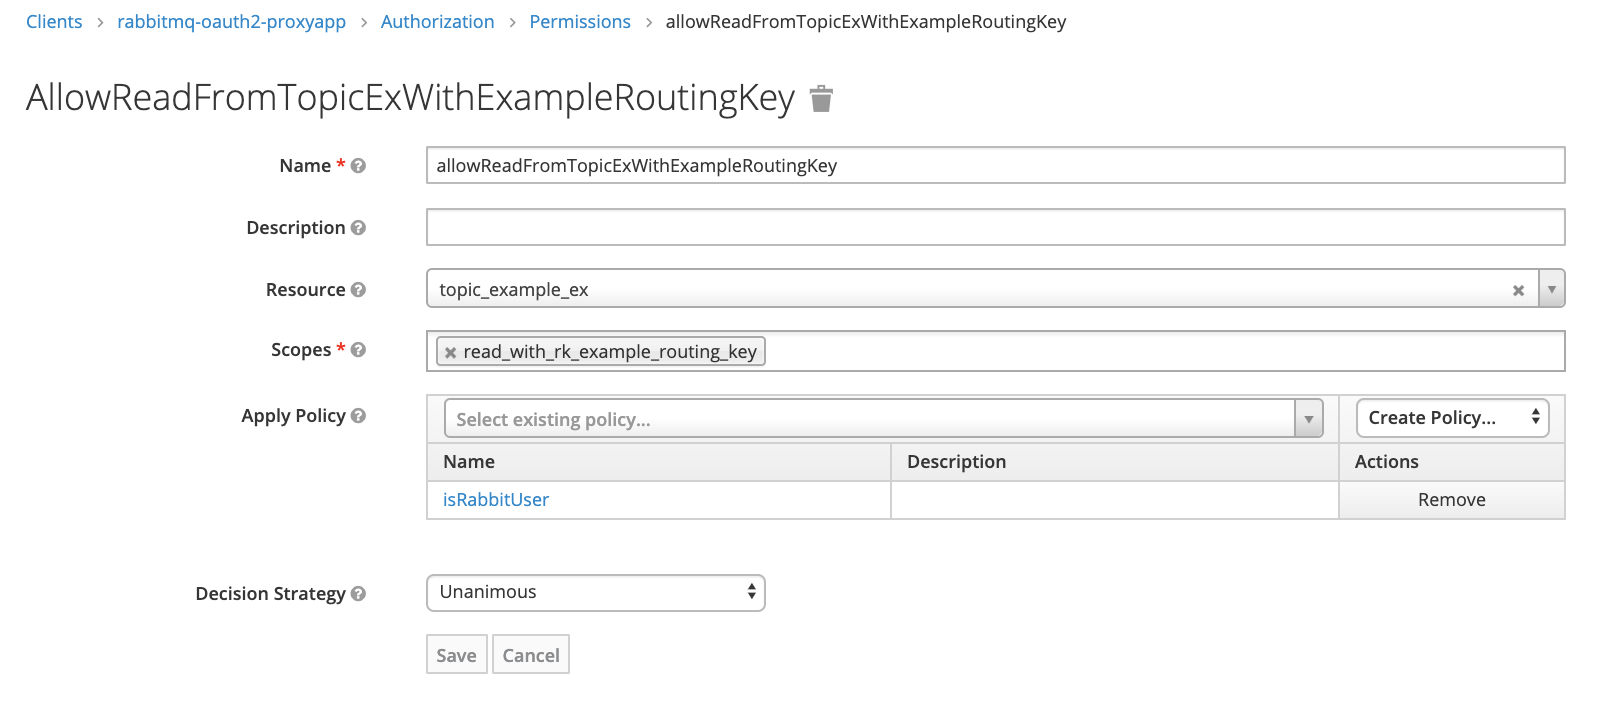
Now we can combine resource, scope and policy into permission – rule saying how resource can be accessed by users.
Permission for vhost access for rabbit_users:
Permission for queue1 configure for rabbit_users
Permission for read with example_routing_key from topic:
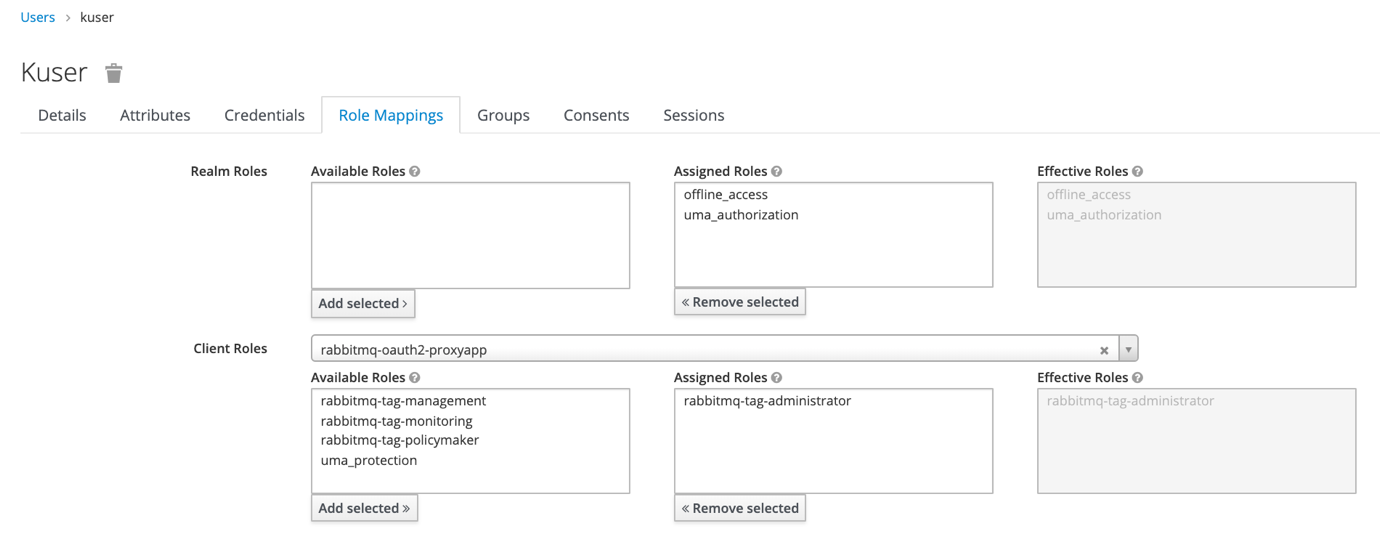
To use RabbitMQ tags (for example to allow access to web management console) we should add client roles as below. They correspond to four tags used by our message broker

If we want to add tag to user simply add him a corresponding role. User can’t have multiple rabbitmq-tag-… roles attached.
5. Concerns for proxy app
In sample application all configuration is taken simply from environment variables using process.env object. It can be changed to more sophisticated solution like config package (https://www.npmjs.com/package/config)
As we get user credentials only when client logs in to RabbitMQ we can get access token only at this point and use it later during authorization. That’s why simple caching was implemented in this test app. Problem appears when access token expires. There is solution for that (not implemented in exapmle app) – during authentication process in response there is also refresh_token field which should be stored in the cache. If later authorization call will return error caused by access token expiration, refresh token should be used to get new access token from Keycloak server.
Authorization process takes one call to proxy app and two calls to identity server. To reduce it we can cache authentication and authorization responses from API at RabbitMQ side using plugin rabbitmq-auth-backend-cache (https://github.com/rabbitmq/rabbitmq-auth-backend-cache).
Instead of using compound scopes names for topics, which include both regular read/write scope and routing key, we can separate them. In this case when performing request to Keycloak we should send multiple scopes in array, for example [“read”, “my_routing_key”]. Both scopes have to be created in our identity server and attached to topic resources.
6. Useful links
https://connect2id.com/learn/openid-connect
https://developers.onelogin.com/openid-connect
https://www.keycloak.org/docs/latest/authorization_services
https://www.janua.fr/understanding-uma-and-keycloak
https://backstage.forgerock.com/docs/am/5.5/uma-guide
![hero image for Open ID: connecting Keycloak and RabbitMQ [Part 2]](https://www.datocms-assets.com/21211/1622197392-1615550810-screenshot-2021-03-12-at-13-06-42-png.jpeg?auto=format&dpr=0.34&w=2219)