

Theory
I've sometimes come across an opinion that writing tests is a waste of time. After all, you can develop yourself by making software free of all bugs, right? But it happens that people make mistakes. It's completely normal!
The goal of the Test-Driven Development technique is to create sketches for future implementations based on the results of previously written tests. It is often misinterpreted as a way to only write tests. It consists of three easy-to-remember phases: RED, GREEN, REFACTOR.

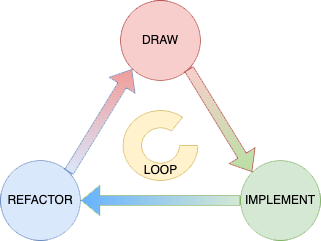
The first phase called RED comes from the color of the result of failed tests, which are usually marked in red. In the diagram, this phase is signed as DRAW, because this is where we prepare the tests and interfaces for future implementations. We expect that any newly written tests should not be executed correctly.
After the initial preparations, it moves to the GREEN phase, whose name - you won't guess - comes from the green color of the tests, which signify completion. Because of the previously designed interfaces, we can proceed to implement our logic. Our focus should not be on the best possible solution, but on ensuring that the process is done correctly.
The last phase is the optimization phase, called REFACTOR. We aim to improve our implementation, with all previous tests performed correctly.
What is worth remembering, this technique does not involve designing the entire project at a time. It can equally well be used to implement single functionality.
Project preparation
As an example, we will create a Dictionary class using Node.js and TypeScript. To do this, we will need Node.js installed and a previously created project. To achieve this let's execute the following commands.
$: mkdir tdd-ts & cd tdd-ts
$: npm init
$: npm install -D typescript @types/jest ts-node ts-jest
$: npx tsc -init
For proper operation of the Jest framework, a configuration file jest.config.ts must be created:
import { Config } from '@jest/types';
import {compilerOptions} from './tsconfig.json';
import { paths ModuleNameMapper } from 'ts-jest';

const config: Config.InitialOptions = {
  verbose: true,
  test Environment: 'node',
  preset: 'ts-jest',
  moduleNameMapper:
   pathsToModuleNameMapper(compilerOptions.paths, { prefix: '<rootDir>/' }),
};

export default config;
As you may notice, I’ve added a path to our sources (moduleName Mapper), which will make our imports more readable. For the added paths to be considered by the translator, we need to add them to the tsconfig.json file:
"compilerOptions": {
 ...
 "paths": {
      "@app/*": ["src/*"]
    }
  },
  "include": [
    "src",
    "tests"
  ]
For practice, I created the tests and src folders where we will store our tests and source files. Test files will have *.spec.ts extension because it is one of the automatically detected by framework Jest.
Tests
The main purpose of the exercise is to prepare a class Dictionary which will return for us previously stored values, by passing the appropriate key. This article is intended to describe the TDD technique, not to explain the implementation in detail. If you are interested in this topic, I refer you to the article: https://codetain.com/blog/dictionary-in-typescript
The Dictionary class must contain methods such as get, put, remove and size. Because each method is public, we need to create a dictionary.ts file along with the IDictionary interface:
interface IDictionary<T> {
 get(): T;
 put(key: string, value: T): void;
 remove(key: string): void
 size(): number;
}
For me, preparing interfaces while writing tests is one of the requirements for proper use of the TDD technique. Interfaces are just a model, with no implementation details, which makes them ideal for this task.
Once it has designed what our class should contain, we can create a list of tests that it will need to pass. To do this, we will create a file called dictionary.spec.ts for them:
describe('Dictionary', () => {
 let dictionary: IDictionary<string>;

 it.todo('should return size');
 it.todo('should put value at key');
 it.todo('should remove value by key');
 it.todo('should get value by key');
})
I added some additional tests and prepared their definitions. There are only tests for two methods of our class, which were prepared for this article. Attempting to run them should fail.
it('should put value at key', () => {
 dictionary.put('firstItem', 'is it work?');

 expect(dictionary.size()).toBe(1);
});

it('throw error when key already exists', () => {
  dictionary.put('firstItem', 'is it work?');

  expect(() => dictionary.put('firstItem', 'or not?')).toThrowError();
  expect(dictionary.size()).toBe(1)
});

it('should return 0 when empty', () => {
  expect(dictionary.size()).toBe(0);
});
Implementation
The next step is to write a definition of our class. Because of the previously prepared interface, we will generate the skeleton of the class and implement the methods we are testing.
We are running our tests once again. This time they should execute successfully.
export class Dictionary<T> implement IDictionary<T> {
  private length = 0;
  private readonly container: { [key: string]: T }  = {}

  put(key: string, value: T): void {
    if(this.container[key])
       throw new Error('Key already exists');

    this.container[key] = value;
    this.length += 1;
  }
  size(): number {
    return this.length;
  }

   // rest of code
}
Refactoring
The last stage is refactoring the class. The basic rule is to keep the green color of tests (including those from the previous cycle). Improvements to the tested class should not affect the results of other tests. In such cases, we should not continue further refactoring.
The Dictionary class should be refactored by improving its readability. The container object doesn’t have its own type declared. Additionally, our class should initialize its fields in the constructor.
type Container<T> = {
   [key: string]: T
}

export class Dictionary<T> implement IDictionary<T> {
   private length: number;
   private readonly container: Container<T>;

   constructor() {
      container = {};
      length = 0;
   }

   put(key: string, value: T): void {
      const exists = this.container[key];

      if(exists) throw new Error('Key already exists');

      this.container[key] = value;
      this.length += 1;
   }

   size(): number {
      return this.length;
   }

   // rest of code
}
After restarting, the tests should still pass. This is how we completed the last of the TDD phases. As the concept is presented as a loop, we should go into the next elements of our project.
Summary
The Test Driven Development technique is not the easiest to use daily. Used correctly, it allows us to control the scaling of the application in terms of new implementations. We can divide it into 3 phases: writing tests, implementation, and refactoring.
Note that this is a technique to streamline the process of structuring the project, and writing tests, and is not a remedy for all problems in the project.
You can find project’s sources on the following Github repository:
https://github.com/pjamroziak/ts-tdd
PS
Even while writing this article, I could easily incorporate TDD techniques. First by planning what chapters should be included here, writing the chapters, and final proofreading each of them :)